
Photos
sorted by best month for evening viewing
Astrophotography, or “imaging” as
it’s usually called by those in the hobby, can be both rewarding and a bit
challenging. Technology has revolutionized all aspects of astronomy. Today’s
amateurs can take better images with specialized digital cameras than
professional observatories could using the old film technology of just a few
years ago. It’s really easy to hold a cheap digital camera up to an eyepiece
and take a great image of the moon. But, if you’ve got any geekiness inside
you, don’t do it! You might get
caught in the world of imaging. It can become an all-encompassing endeavor
eating up countless hours while making your bank account vanish. Although you
can start with relatively inexpensive hardware and free software, you’ll
progressively want more expensive cameras, bigger telescopes, better mounts,
and fancier software. It’s an addiction that never ends. Plus, there can be a
fairly lengthy learning curve involved in this hobby and a million things can (and
do)
go wrong, so don’t even think about it unless you’ve got an amount of patience
and perseverance that borders on masochism.
If it’s so challenging and
expensive, why do I do it? Perhaps it’s because it isn’t easy. Perhaps because
it reveals a universe we can’t otherwise experience. And I get to do it myself,
with my equipment, in my backyard, without relying on some massive government
project. There’s a popular belief that high magnification is required. Of
course, this is true for many objects, but most of the images I take magnify
objects just 10 to 50 times (if printed on 10”x8” and held a couple feet
away).
This isn’t a lot. Many deep sky objects viewed by amateurs are fairly large;
some are several times larger than the full moon. But they are very dim
requiring the hardware to gather much more light than the human eye can detect.
My 12.5” telescope obtains 2300 times more light, a digital camera can increase
this by a factor of 50 times, and a 5 hour exposure increases it by an
additional factor of 500,000. I can’t think of another field capable of over a
50 billion times amplification. Perhaps it’s just the technical challenge.
Regardless, I find it very rewarding (yes, I may be a bit crazy – it’s
practically a requirement in this hobby).
When I started taking digital images, I was amazed at what I could see
with a camera compared to an eyepiece. Visual astronomy requires a very dark
site with absolutely no stray light destroying your dark adapted eyes. Of
course, dark skies are always an advantage, but a camera doesn't care about
that street light down the block. Cameras are always ‘dark adapted’ and they
are better at capturing photons. Faint objects require more exposure time than
brighter objects while most are very faint. Our eyes gather light for
only about 1/30 of a second before resetting our mental image while a digital
camera can build up an image practically forever. A simple 10 second exposure
gathers roughly 300 times more light than our eyes can capture with an eyepiece
on the same scope – and that’s not including the fact that the camera is over
50 times more efficient at detecting photons. I initially took a lot of 10 to
60 second exposures each evening. The images were crude with lots of noise but
the objects were far more recognizable than what I could see using an eyepiece.
I'd brag about how many objects I captured. Two or three dozen during the
evening wasn't unusual. Now I realize how foolish that was. The images recorded
by a camera can last forever and be viewed anytime so why not take a bit more
effort and make them look as good as possible. Better images require longer
exposures. I now know the figure of merit isn't "how many images per
night" but more likely "how many nights per image". I usually
use exposures of 5 to 20 hours. Obviously, this can’t always be done in a
single night. Given daylight, clouds, rain or snow, and perhaps a full moon
coupled with some objects only being visible part of the night, it may actually
require several days, weeks or sometimes even months just to get sufficient
time with the right sky conditions (I told you
patience is required).
How can such an exposure be made? Well one benefit of today's digital world is
that we can get the advantages of a very long exposure by combining many shorter
exposures. I may take as many as fifty or sixty 10-minute exposures throughout
a night's session and repeat this over several nights. I then tell my computer
to add all the good ones together after discarding the images where something
went wrong. This effectively gives me a very long exposure without worrying
about shifting clouds destroying the image or a plane, satellite or meteor
going through my field of view (all very common). Yea, there's actually a lot required to
make this happen. But that's what makes it challenging.
I’m not a novice and clearly not an
expert. Guess that makes me a fairly typical deep sky imager - at least among
those serious about the hobby. I started the activity shortly after collage (many
years ago) when Celestron came out with their C8 Schmidt-Cassegrain scope. This
very popular little 8” orange scope revolutionized amateur astronomy and
eventually led to today’s fantastic equipment. In those days imaging meant
using specially hyped film with hours of manual guiding just to get something
vaguely similar to what you’d see in magazines. Well, it was just too hard for
me. I put the scope away until I discovered the new world of digital imaging. I
followed the rule of acquiring ever more expensive hardware starting with just
basic equipment and slowly acquiring a better camera, mounting the scope on a
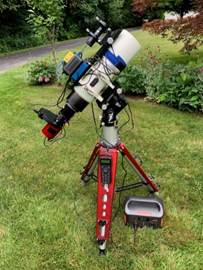
better mount and finally getting a better scope. I’ve now got some great
hardware including an Astro Physics AP-900 mount on a permanent pier, a Rainbow
Astro RST135E portable mount, Takahashi FSQ-106 4” refractor, Planewave 12.5”
CDK scope, and Finger Lakes Proline 16803 camera. Better equipment doesn’t
necessarily lead to better images but it does mean less effort is required.
Someone starting out in the hobby today has the advantage of an explosion in the
availability of really good hardware and software at very low cost that’s
occurred over the last few years. This has made the hobby much easier and far
more affordable.
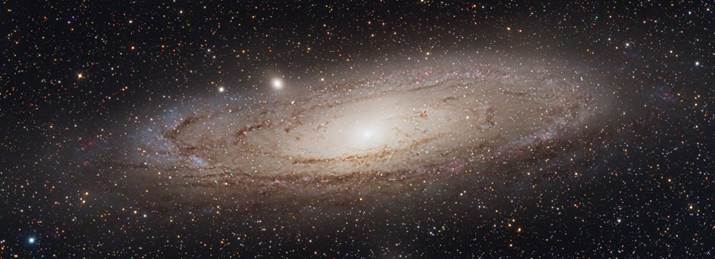
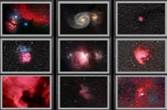
I specialize in deep sky images.
This means galaxies, star clusters, supernova explosions, planetary nebula, and
beautiful clouds of gas and dust scattered throughout the Milky Way. Although I
have many great Televue eyepieces, I almost never use
them. I just can’t see observing a dim fuzzy blob when you can get great images
through digital time exposures.
And since everything is computer controlled, I can do it in a nice warm living
room in the winter or hiding from bugs in the summer. I also don’t do much
solar system work. Imaging planets or the sun uses a totally different
process than deep sky imaging. I do have special filters for the Sun and
several good video cameras key to solar system imaging, but for some unknown
reason haven’t done much with them.
Deep sky imaging is dependent on
equipment, processing skill and sky conditions. I have good equipment and am
working on my processing skills but there’s no substitute for dark steady
skies. Unfortunately, my sky is neither dark nor steady. I use 2 observing sites. Most images are
taken at my home 60 miles north of New York City. Observing conditions are not
the greatest. I have limited sky visibility, considerable light pollution and
poor seeing. Surrounding trees hide altitudes under 35 degrees to the east and
55 degrees to the west with a visual magnitude limit of about 5.4 at best. It’s
rarely that good. In fact, I usually have a hard time spotting the magnitude 2
star, Polaris. It’s normally a class 6 location (orange) on the
Bortle scale, occasionally moving into class 5. Summer images are often taken
at a location 144 miles further north. Here the sky is better at about a 6.3
visual magnitude and the Milky Way is clearly visible with a lot of detail.
However, thanks to a nearby lake, there is a lot of water vaper in the air
which often fogs up after midnight significantly limiting imaging time. I’m
often asked “how can you do astrophotography with these sky conditions”. I know
my images will never compete with those taken from a better site. But this
hobby is about enjoying what you can do yourself, even if it isn’t the best in
the world – just like every other hobby from playing golf to painting
landscapes.
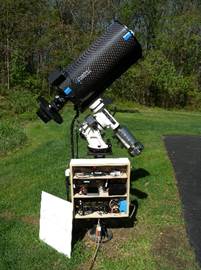
I consider both locations to be
semi-permanent. They both utilize a fixed pier with all equipment mounted 24/7
but not contained within a permanent structure. I use a TeleGizmos
365 series cover plus a garden variety Home Depot brown tarp to protect the
equipment. Power supplies and all
electronics, including a headless computer (no monitor or keyboard), are
contained in a simple box hung on the pier. This keeps cables short and
organized with a simple bundled cable set feeding the camera/focuser/heater units
and a second bundled cable set feeding the mount. This computer runs all the
software controlling the scope, mount and cameras plus a couple of weather
stations monitoring clouds, darkness and rain. A LAN connection allows remote
control of the system using VNC software. I use a remote laptop to setup a
night’s operations then usually an iPad to periodically monitor or modify
operations. Occasionally I’ll use my iPhone when I’m away from home.
I use software popular with many
deep sky imagers: Windows 10 Pro with TheSkyX
planetarium software, ASTAP for plate solving, PHD2 for guiding, NINA for image
capture, MaxIm for image calibration, CCDStack for stacking and initial stretching, and Photoshop
with a bit of PixInsight for image processing. NINA
lets me run the whole thing while I get a good night’s sleep. It can
automatically sequence through the objects I’ve selected with the appropriate
filters, focus the scope, rotate the camera as needed, correct for pointing
errors, select guide stars, make calibration frames, and of course take the
images that I can process the next day.
I can fully understand why multi-hour exposures
or processing with complex programs like Photoshop or PixInsight
might not be for everyone. But that doesn’t mean you need to suffer looking
through an eyepiece at dim ill-defined blobs. Sometimes I attach a digital
camera to a scope and just take short exposures of just a few seconds to a few
minutes. Visual Imaging is the name I use to describe using a camera to see
more than what most scopes offer with an eyepiece but without spending the time
or effort to make pretty pictures. This is sometimes called Electronically
Enhanced Astronomy, EEA, or Electronically Enhanced Visual Astronomy, EEVA, or
Observational Astrophotography. A monochrome astronomy camera works best but a
normal DSLR or mirrorless camera is fine. Raise the gain and/or increase
binning if your camera allows it. The scope could be as simple as a regular
camera lens attached to an inexpensive tracking device on a tripod. Objects are
then viewed on a computer, tablet or camera screen. You’ll get better views
with more advanced hardware but at more cost and complexity. As I said before,
the camera is far better at capturing dim images than the human eye. This
configuration lets me enjoy many of the sights available in the night sky with
clarity but without complexity. They won’t be as impressive as the processed
long exposure photos seen in magazines but galaxies, bright nebula and larger
planetary nebula actually look like they should. Visual imaging is a simple way
to enjoy deep sky astronomy and, in my opinion, more rewarding than using an
eyepiece.